Python SEO: every marketer with an interest in SEO who has ever attended an international lecture can hardly ignore the possibilities of Python. However, if you have never programmed before and have to start with Python from scratch, it can quickly feel like a distant prospect. Yet it's a shame to ignore all these tips and not start. When you know how to use Python correctly, you can significantly shorten your SEO tasks. So you have more time to focus on other matters. This is not only easy, but it will also help you grow online extra quickly. With Python, you can:
- Monitor changes on your pages or robots.txt;
- Cluster keywords;
- Create bulk exports via APIs;
- Scrape your pages or Google's results pages;
- And (much) more!
This is why we delve deeper into Python with this blog and how you can start from 0. In this blog, we provide you with all the ins and outs about Python and all the possibilities. Then we guide you through the installation process so you can run your first file using our favorite scripts.
What is Python?
Python is a programming language and even the most popular programming language in the world. A programming language can be used to communicate with the computer. With Python, you can have your computer perform a variety of tasks, from building and running websites to performing data analyses, automation, and building physical models: there is little this language is not suitable for. For this reason, Python is also known as a general-purpose language. This means that the programming language can be used for many different applications, including SEO. If you are completely new to programming languages, you will probably understand little of all these different codes. Yet Python is one of the easiest and most clear languages to learn. Additionally, the average online marketer is familiar with markup languages, such as HTML, CSS, and certainly Javascript. If you belong to this group, you will probably already have some feeling when you start working with this language.
The possibilities of Python for SEO
We already touched on it in the previous section, but Python has a multitude of possibilities. As a marketer, however, you will have little use for the various possibilities to build mathematical and physical models, so we will only focus on the possibilities to make your work as a marketer as easy as possible. The most used (and most handy) options for SEO are to use Python to automate your tasks and perform data analyses. By automating your weekly repetitive tasks, for example, you can have your computer perform various tasks with the push of a button, allowing you to spend your time on more important matters. Additionally, a strong data analysis provides extra insights, especially for large websites. Python is therefore very suitable for saving time and providing insights as input to guide your SEO strategy .
The possibilities to start with Python
Python is a programming language. Like other languages, however, you need a tool to communicate with it. With a normal language, this is, for example, through a book or your voice, but with a programming language, it works a bit differently. Before we move on to how we can use Python, we want to point out that there are many different options to communicate with Python, each with its pros and cons. Commonly used options are:
Visual Studio Code
Advantages
- Powerful code editor with many handy features such as syntax highlighting, code autocompletion, debugging, and Git integration.
- Extensive extensions for Python development, such as Jupyter Notebook support and integrated terminal.
- Can be customized to the individual needs and workflow of the developer.
Disadvantages
- Requires more manual configuration and installation of Python-related extensions compared to other tools.
- Less focused on data analysis functionality and more on general code development.
Google Colab
Advantages
- Cloud-based environment that allows Python code to be executed directly in the browser without any local installation.
- Offers free access to hardware resources, such as GPUs and TPUs, so you don't have to perform calculations locally. (recommended for weak local systems)
- Supports Jupyter Notebooks, enabling interactive and documentation-oriented data analysis.
Disadvantages
- Requires more manual configuration and installation of Python-related extensions compared to other tools.
- Less focused on data analysis functionality and more on general code development.
Jupyter Notebook
Advantages
- Interactive environment for data analysis with support for live code, text, images, and visual display of results.
- Popular in the data analysis community due to the ability to combine code, results, and documentation in a single document.
- Supports a wide range of programming languages besides Python.
Disadvantages
- Interactive environment for data analysis with support for live code, text, images, and visual display of results.
- Popular in the data analysis community due to the ability to combine code, results, and documentation in a single document.
- Supports a wide range of programming languages besides Python.
Spyder
Advantages
- Specifically designed for scientific calculations and data analysis with an integrated IPython console, variable inspection, and plotting.
- Features a clear interface with handy tools for data analysis, such as variable inspection and plotting.
- Also supports other popular languages for scientific calculations, such as R.
Disadvantages
- Less powerful code editor compared to standalone code editors like Visual Studio Code.
- Less extensive extensions and community compared to some other tools.
We understand that it can be difficult for a beginner to make a choice with the above pros and cons. In this blog, we focus on using Python in combination with Anaconda and Jupyter Notebook. However, know that there are other possibilities to work with Python.
Installing Python
For the examples in this blog, we will use Jupyter Notebook in combination with Anaconda. However, we need to start with the installation of Python itself. On iOS, this is automatically included. Yet, even in this case, it is good to follow all the steps to ensure you have the latest version of the programming language on your system. Let's get started:
Installing Python
Before we proceed with the installation, we first check which version of Python is on our system. We can do this by opening the command prompt on your PC. You do this by going to the search bar and typing command prompt. Then open the program.
In this prompt, we want to see which version of Python we are running. We do this by entering the prompt: python –version. Then click Enter. When you have done this, you will see the following screen:
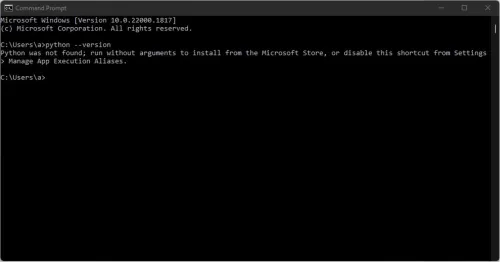
If Python is not found, or you have an old version installed, we need to first put the latest version of Python on the PC before we can proceed. We do this from the official Python website: https://www.python.org/downloads/. Then download the latest version via this button:
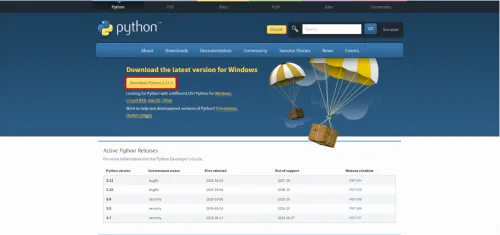
When it is finished downloading, you can open the download to continue with the installation process. This is quite straightforward, but you need to check a few options to complete the installation correctly.
Pay close attention during the installation to whether your system runs on 32-bit or 64-bit. If you don't know, it's best to download the 64-bit version. This is the standard version that most systems run on. If your system runs on 32-bit, you can click on your operating system under the download button, after which you will see a screen with links where the 32-bit version for your operating system is also included.
When you start the setup, it is important not to install Python right away. There are several options we need to check to be able to run scripts. In the first menu, we need to check Add python.exe to PATH before proceeding with the installation.
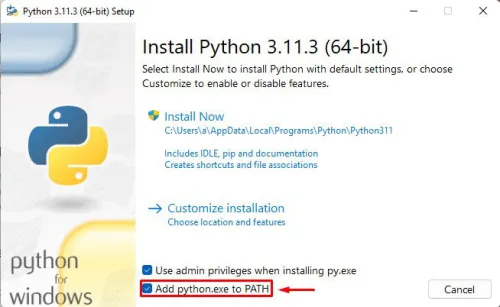
Then click through to Customize installation. We now get various optional features. You can leave these all checked for now and click Next. We now end up in the next window.
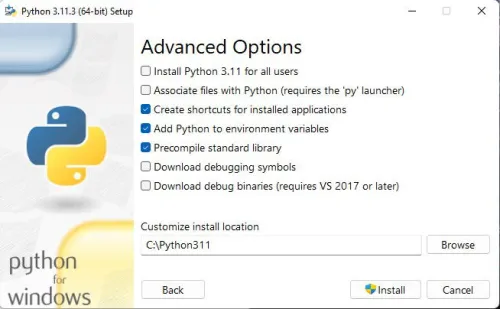
Here too, you can leave all options checked. What we do want to change is the installation location. We want to keep it as close to the root of the system as possible. As you can see in the image, the installation is now installed deep from the root. We therefore remove the entire folder structure so that the path looks like this:

We can now click install to put Python on your system. You can test if this went well by running the same prompt we executed before the installation. At this point, the prompt should give a different response, which is that it returns the latest version of Python. It looks like this:
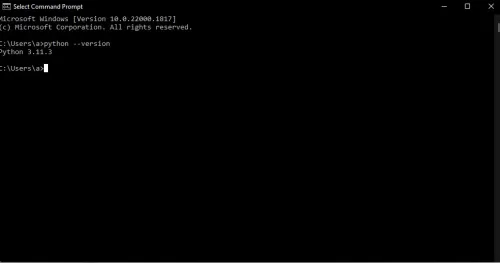
This means that Python is correctly installed on your PC. Do you still get back that Python is not found? Then remove the program from your PC and make sure you have followed all the steps correctly.
Installing Anaconda
Great, we have now installed Anaconda, but we can't do anything yet. To be able to program and have scripts, we therefore need Jupyter Notebook. To make our lives easier, we first install Anaconda for this.
Anaconda can be downloaded from the following URL: https://www.anaconda.com/. You can proceed to download directly from the homepage. If you are running on Windows, you can click on the green button. For iOS and Linux, you need the button below:

Then run the installation. You can read the options during the installation here, but if you don't know what this means, you can click through each window up to the Install window. You can also click install directly here, after which Anaconda will be installed on your system. When the installation is complete, you can click through, and in the last window, you have the option to read some documentation. You are, of course, free to do so, but for now, we will proceed directly with the installation of Jupyter Notebook.
Installing Jupyter Notebook
We have now installed Anaconda, and the handy thing about this is that we can install Jupyter Notebook directly from Anaconda. We do this from the Anaconda prompt. We open the Anaconda prompt by searching for Anaconda in our explorer. The Anaconda prompt screen looks similar to the Windows Command prompt.
To install Jupyter Notebook, we directly execute the following prompt in this window.
pip3 install jupyter
After entering the prompt and pressing the Enter button, you will see the installation being executed. Wait until it is finished. To open Jupyter Notebook, you can immediately enter the following prompt:
jupyter notebook
If all installations have been executed correctly, a window should now open in your browser where Jupyter Notebook will start running. We can now move on to the real work!
How to work in Jupyter Notebook
When you start Python, a new tab will open in your browser where the program will run. The first screen you land on looks like this (without the outlined parts with numbers):
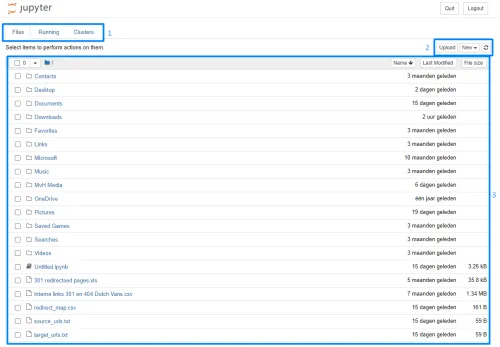
- Under the first outline, you can switch between the different tabs. The first tab contains the various files you have on your PC or laptop. You can also switch to tabs where your running files can be found, and the cluster tab can be used for parallel computing, but we will not go into this further in the basics.
- The second outline can be used to upload a new file or create a new file. Therefore, if you need to upload files (for the scripts later in the article) or want to use a new script, you can do so here.
- The third outline contains all the files you have already created or uploaded. You can easily open them by clicking on the respective file.
Running your first script
To run your first script, we first create a new file via new > Python 3 (ipykernel).
You will now end up in a screen where there is a text line to write scripts, as well as various options in the menu bar.
For now, it is important to know that when you want to write or paste a script, you can add it via the following bar:

We start with an easy example where we scrape a page from a chosen website. In this example, we scrape the televisions page from Expert. The script starts by importing the correct libraries. A Python library is a collection of pre-written code and functionalities that developers can use to perform certain tasks and functions more easily in Python programs. There are many of these libraries, and this is one of Python's strengths. The library we load to scrape is cloudscraper. This data is then analyzed by BeautifulSoup. You will often encounter these two libraries when using or building scripts in Python where you scrape pages.
However, those who use tools like ScreamingFrog or SEO Minion may not see the added value of the script below. This is a simple example from us to explain how scripts work. If successful, you should also be able to handle the scripts below.
import cloudscraper from bs4 import BeautifulSoup scraper = cloudscraper.create_scraper() # here you fill in your desired URL, we are now using Expert's html = scraper.get("https://www.expert.nl/televisies") soup = BeautifulSoup(html.text)
We then keep the scrape simple by only scraping the meta title and meta description. We use the following code for this:
metatitle = (soup.find('title')).get_text() metadescription = soup.find('meta',attrs={'name':'description'})["content"]
We then want to make the scrape data visible as output. We use a simple piece of code that looks like this:
print("Meta Title:", metatitle) print("Meta Description:", metadescription)
The complete script will then look like this:
import cloudscraper from bs4 import BeautifulSoup scraper = cloudscraper.create_scraper() html = scraper.get("https://www.expert.nl/televisies") soup = BeautifulSoup(html.text) metatitle = (soup.find('title')).get_text() metadescription = soup.find('meta',attrs={'name':'description'})["content"] print("Meta Title:", metatitle) print("Meta Description:", metadescription)
When we enter this in the previously mentioned notepad in Jupyter Notebook, we get the following output:
Meta Title: Buy TV? Every Television Quickly & Free Home Delivery | Expert.nlMeta Description: Buying a new TV? At Expert, you will find a large assortment of televisions, so you will always find what you are looking for. And every TV you buy at Expert comes with free shipping!
Do you get error codes that the library cannot be imported? Then you need to install it. This can be done in the Anaconda prompt by typing pip install followed by the respective library. This way, you should also be able to run the above prompt for a page of your choice.
In the next section, we will focus on scripts that can be a valuable addition to your SEO strategy.
Examples of useful scripts as an SEO
For the following solutions, we use some handy scripts that can be a valuable addition for every SEO, online marketer, or all-round marketer who takes their organic findability seriously. We start with a script that can cluster keywords into topic clusters. This way, you can more easily build your pages and link them internally.
Clustering keywords into topic clusters
New pages and internal links are important for every website. If you want to significantly grow your website in terms of pages and keywords, the first step is a strong keyword research. To cluster these keywords into so-called topic clusters, we can use a script. The script (from John McAlpin) we use for this looks like this:
import csv import numpy as np from sklearn.cluster import AffinityPropagation from sklearn.feature_extraction.text import TfidfVectorizer # Read keywords from text file with open("keywords.txt", "r") as f: keywords = f.read().splitlines() # Create a Tf-idf representation of the keywords vectorizer = TfidfVectorizer() X = vectorizer.fit_transform(keywords) # Perform Affinity Propagation clustering af = AffinityPropagation().fit(X) cluster_centers_indices = af.cluster_centers_indices_ labels = af.labels_ # Get the number of clusters found n_clusters = len(cluster_centers_indices) # Write the clusters to a csv file with open("clusters.csv", "w", newline="") as f: writer = csv.writer(f) writer.writerow(["Cluster", "Keyword"]) for i in range(n_clusters): cluster_keywords = [keywords[j] for j in range(len(labels)) if labels[j] == i] if cluster_keywords: for keyword in cluster_keywords: writer.writerow([i, keyword]) else: writer.writerow([i, ""])
To get this script working, you will first need to import a TXT file into your files containing all the keywords you want to cluster. For each keyword, use a new line in your text file. When this is done, name this file: keywords.txt. Upload this to the files in your Jupyter Notebook.
We have as an example exported keywords about bicycles and mainly electric bicycles. We have processed these keywords in a TXT file (via notepad), uploaded it, and executed it. The input of this can be found below:
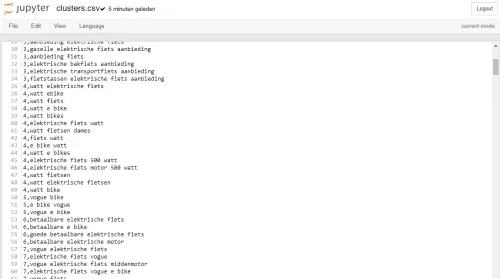
The keywords are clustered per number. This CSV file can also be found in your Jupyter Notebook files. You can open it in Jupyter Notebook, but also download and open it in Excel or a Google Spreadsheet.
Bulk import of Google Trends data
The next script comes from our own kitchen. Anyone who has ever wanted to view Google Trends data for multiple keywords has noticed that this can take a lot of time in a web browser. Fortunately, there is the script below where you can supply all your keywords via a CSV file, and the script will return all your keywords, but now provided with all Google Trends data.
The script looks like this:
from pytrends.request import TrendReq import pandas as pd import time pytrends = TrendReq(hl='nl', tz=120) # Read the keywords from the CSV file keywords_df = pd.read_csv('keywords.csv') kw_list = keywords_df['Keywords'].tolist() # Number of keywords per batch batch_size = 5 # Split the keywords into batches batched_kw_list = [kw_list[i:i+batch_size] for i in range(0, len(kw_list), batch_size)] # Retrieve data for each batch batch_data = [pytrends.build_payload(batch, cat=0, timeframe='today 12-m') or pytrends.interest_over_time().reset_index() for batch in batched_kw_list] # Combine the data from all batches combined_data = pd.concat(batch_data) # Select only the keywords that are actually available in the data available_keywords = list(set(combined_data.columns) - {'date'}) kw_list = [kw for kw in kw_list if kw in available_keywords] # Remove the 'isPartial' column from the data combined_data = combined_data.drop(columns=['isPartial']) # Transpose the data transposed_data = combined_data.set_index('date').T.reset_index() # Rename the column header 'index' to 'Keywords' transposed_data = transposed_data.rename(columns={'index': 'Keywords'}) # Save the combined and transposed data to a CSV file transposed_data.to_csv('output.csv', index=False)
Per # it is indicated what the code below does. If you are not familiar with this, the only thing you need to do is place a CSV file in your files with one column named Keywords (this is case-sensitive) in which you paste all your keywords for which you want to know the Google Trends data. Then paste the script into Jupyter Notebook, as we did earlier, and execute it. When it is completed, you will see a CSV file named output.csv among your files. You can then use this file to, for example, add it to your content roadmap or create graphs with it.
Keeping track of robots.txt changes
Anyone who is somewhat familiar with SEO knows the importance of a robots.txt, but also the catastrophic consequences it can have on your SEO results when important pages are excluded. An extra check on your file is therefore not a luxury. Under the motto of better lazy than tired (and of course it is a very mind-numbing task to do this yourself every day), we can also write a script that indicates whether changes have been made to your robots.txt. We use the following script for this example:
import requests import hashlib import time def log_check_result(result, log_file): with open(log_file, 'a') as file: file.write(result) def check_robots_txt(url, previous_hash, log_file): try: response = requests.get(url) response.raise_for_status() current_hash = hashlib.sha256(response.text.encode('utf-8')).hexdigest() if current_hash != previous_hash: result = f": A change has been detected in robots.txt.\n" log_check_result(result, log_file) print("A change has been detected. A notification has been sent.") else: result = f": No changes detected in robots.txt.\n" log_check_result(result, log_file) print("No changes detected.") return current_hash except requests.exceptions.RequestException as e: result = f": Error checking robots.txt: \n" log_check_result(result, log_file) print(f"Error checking robots.txt: ") return previous_hash # URL of the robots.txt you want to check url = "https://www.folloagency.com/robots.txt" # Previous hash value of robots.txt previous_hash = None # Log file for results log_file = "robots_check_log.txt" # Check loop daily while True: previous_hash = check_robots_txt(url, previous_hash, log_file) # Wait 24 hours before performing the next check time.sleep(24 * 60 * 60)
In the case of this script, a log is made daily, and this log is processed in a text file named: robots_check_log.txt. The script does this for the robots.txt of our own Follo website at the moment, but you can of course change this to your own website.
The nice thing about this script is that it is quite basic, but you can get started yourself to make something really useful out of it. At the moment, the file where the script is located must be running to perform the check. Since you don't want to turn on the script every morning yourself, there are various solutions that allow you to turn it on once, and the script does the rest.
Don't feel like going to the log file every time, but just want to receive a daily email about whether or not changes have been made? That is also possible by expanding the script. These solutions are more for an advanced article, but know that there are various options and that you can adjust the script so that it perfectly meets your needs. If you are curious about how you can do this, we already give various tips below to give you a kickstart.
Writing your own scripts: our tips
Using other people's scripts is very handy, and it is also a good way to have a basis yourself when you start working on your website. However, if you want to get more out of Python, it is advisable to also start writing scripts yourself and expanding scripts until they perfectly meet your needs. You have several options to start with, which we would like to highlight.
Programming with AI
Working with Python already goes into the principle: why make it difficult when it can be easy. When you start using AI to build scripts, this principle certainly applies. AI chatbots are your personal assistant when it comes to building scripts. So if you want to build an easy script but have no idea where to start, AI chatbots are ready for you. Do you have a script that you think should really work, but you keep getting errors? Perhaps the help of an AI chatbot is all you need to get it working. Especially if you already have some knowledge of programming, you can let ChatGPT do most of the work while you test and give direction. If you are completely new to Python as a programming language, we recommend learning the basics first before starting to write your own scripts.

Learning to program yourself
If you really want to make good scripts, you cannot avoid learning to program yourself. As an SEO or online marketer, you usually don't need to be a senior programmer, but you can get quite far with the basics. There is actually no strong course purely focused on SEO, but there are several other general courses that teach you the basics, which you can then apply to your scripts focused on SEO. Some of our recommendations are:
How to proceed with Python for SEO
Python is incredibly large, and there is no blog that can show all the possibilities. Therefore, if you are interested in applying Python within your strategy, it is certainly advisable to learn the basics of Python and start writing scripts yourself. Our advice is to look at how large your website is. Do you have a few hundred pages on your website? Then nine out of ten times, it is faster to use the many available tools, such as ScreamingFrog with Excel, to get your SEO insights. However, if you are a marketer of a large e-commerce website with many thousands of products, Python can certainly speed up your work significantly, provide new insights, and automate the tedious work. This way, you have more time for the SEO tasks that really require human insight, and you can provide your added value as a marketer.
Advanced Python solutions for your SEO strategy
Have you discovered the added value of Python for your company through this blog? At Follo, we have the expertise to make your SEO data-driven with Python and give you quick and clear insight into the data that is important for your growth. This way, you not only have an advantage over your competitors in terms of speed in your SEO work but also in terms of the data you have at your disposal.
So feel free to contact us, and we will ensure that you can win from your online competitors using the latest technological solutions and possibilities.
```


